|
a |
|
b/README.md |
|
|
1 |
# Overview |
|
|
2 |
In this repository you will find a Keras implementation of CT-GAN: A framework for adding or removing evidence in 3D volumetric medical scans. In this readme, you will find a description of CT-GAN, examples of how to use the code, and links to our tampered datasets. For more details, please see our publication: |
|
|
3 |
|
|
|
4 |
*Yisroel Mirsky, Tom Mahler, Ilan Shelef, and Yuval Elovici. CT-GAN: Malicious Tampering of 3D Medical Imagery using Deep Learning. 28th USENIX Security Symposium (USENIX Security 19)* |
|
|
5 |
|
|
|
6 |
([full paper here](https://www.usenix.org/system/files/sec19-mirsky_0.pdf)) |
|
|
7 |
Links to datasets are found below. |
|
|
8 |
For access to the pretrained models, please reach out to me (contact below). We will only supply the models to verified academic researchers. |
|
|
9 |
|
|
|
10 |
**Disclaimer**: This code has been published for research purposes only. It is our hope that with this code, others will be able to better understand this threat and find better ways to mitigate it. |
|
|
11 |
|
|
|
12 |
|
|
|
13 |
## What is CT-GAN? |
|
|
14 |
|
|
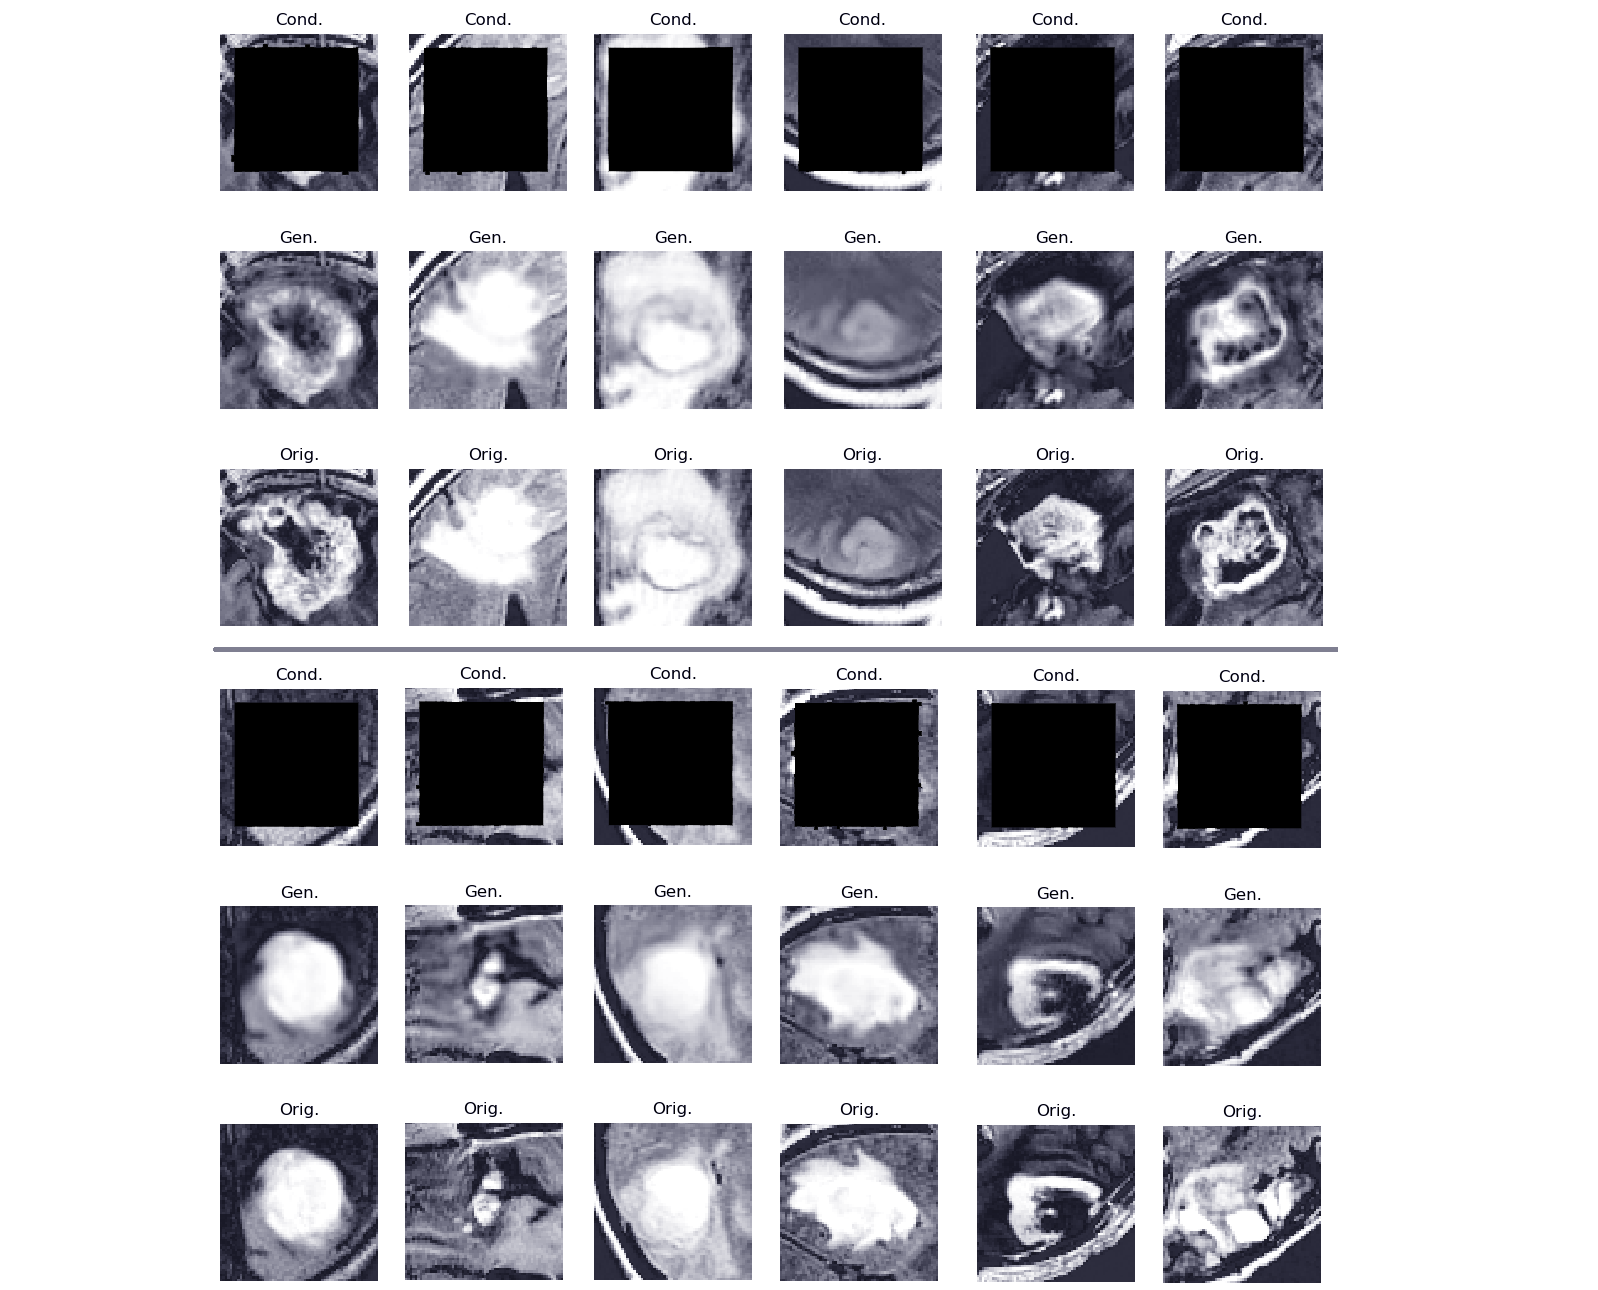
|
15 |
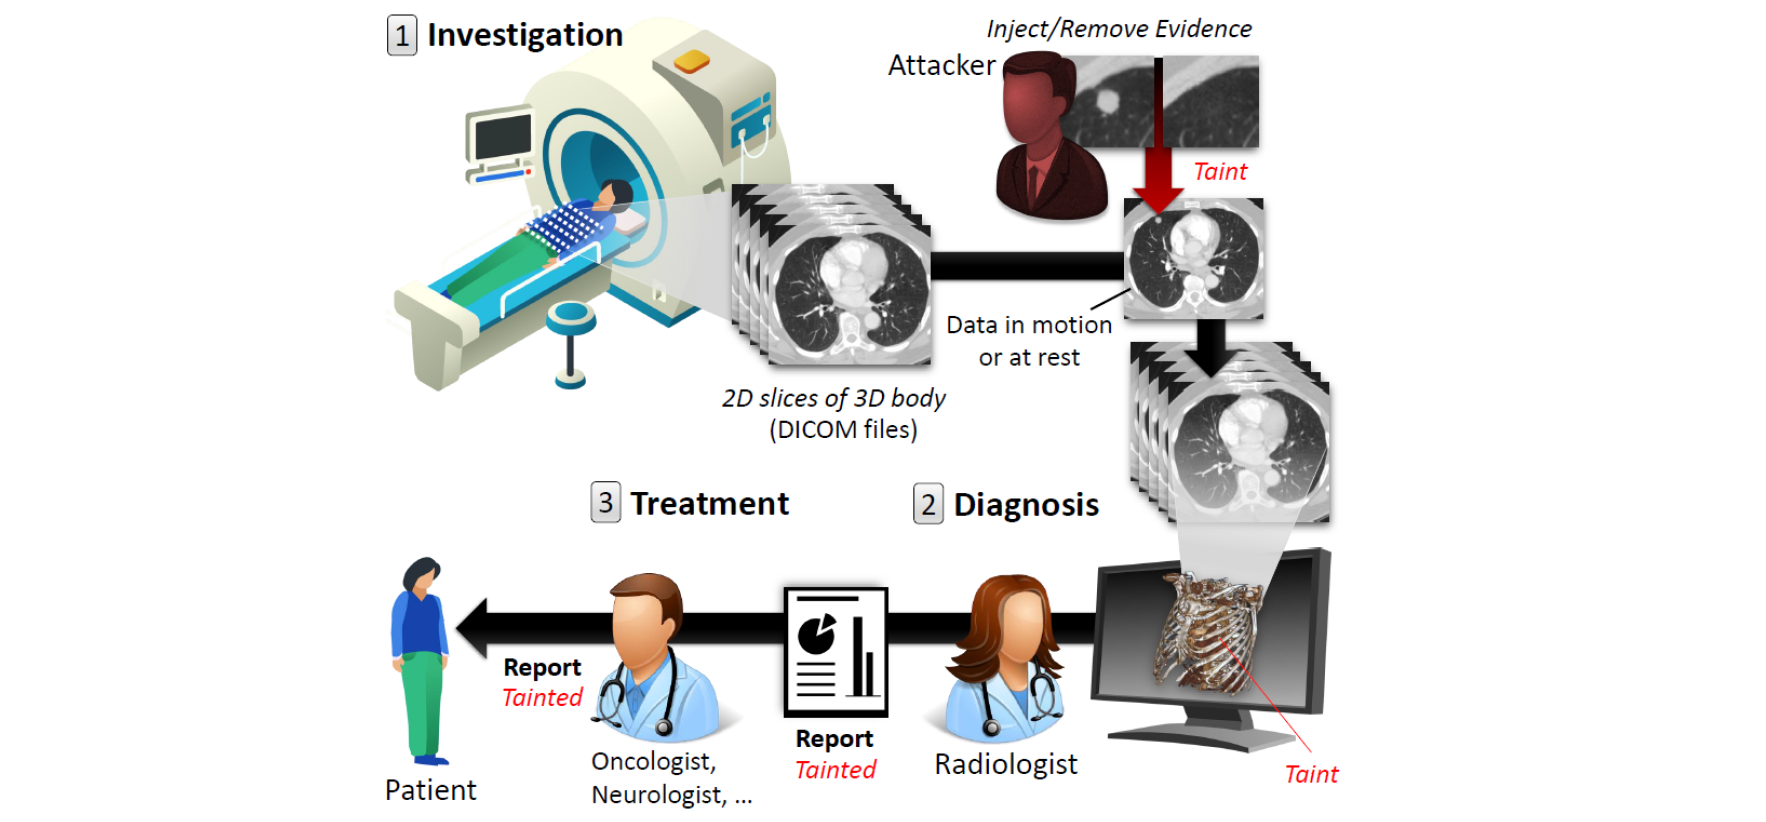
In 2018, clinics and hospitals were hit with numerous attacks |
|
|
16 |
leading to significant data breaches and interruptions in |
|
|
17 |
medical services. An attacker with access to medical imagery can alter the |
|
|
18 |
contents to cause a misdiagnosis. Concretely, the attacker can |
|
|
19 |
add or remove evidence of some medical condition. The figure below illustrates this attack vector. |
|
|
20 |
|
|
|
21 |
*An illustration of the attack vector within a hostpital:* |
|
|
22 |
 |
|
|
23 |
|
|
|
24 |
There are many reasons why an attacker would want to |
|
|
25 |
alter medical imagery: to disrupt a [political] leader's life, perform ransomware, an act of insurance fraud, falsifying research evidence, sabotaging another company’s research, job theft, |
|
|
26 |
terrorism, assassination, and even murder. |
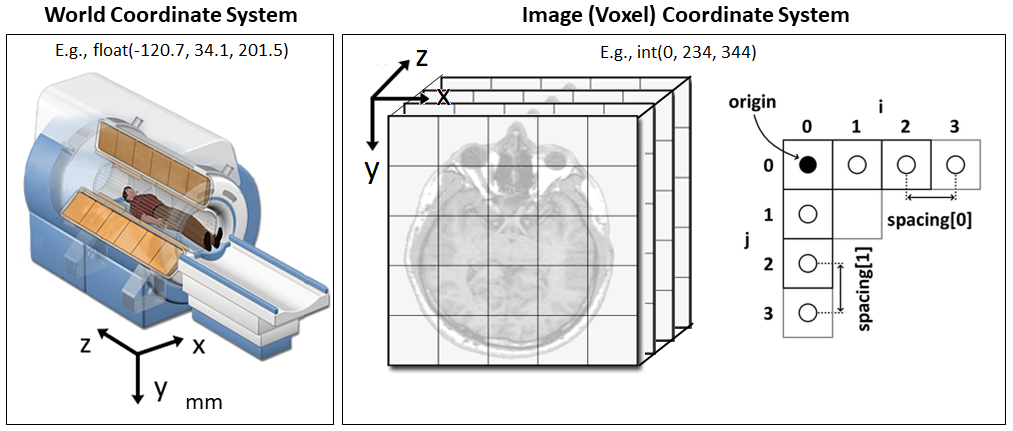
|
|
27 |
|
|
|
28 |
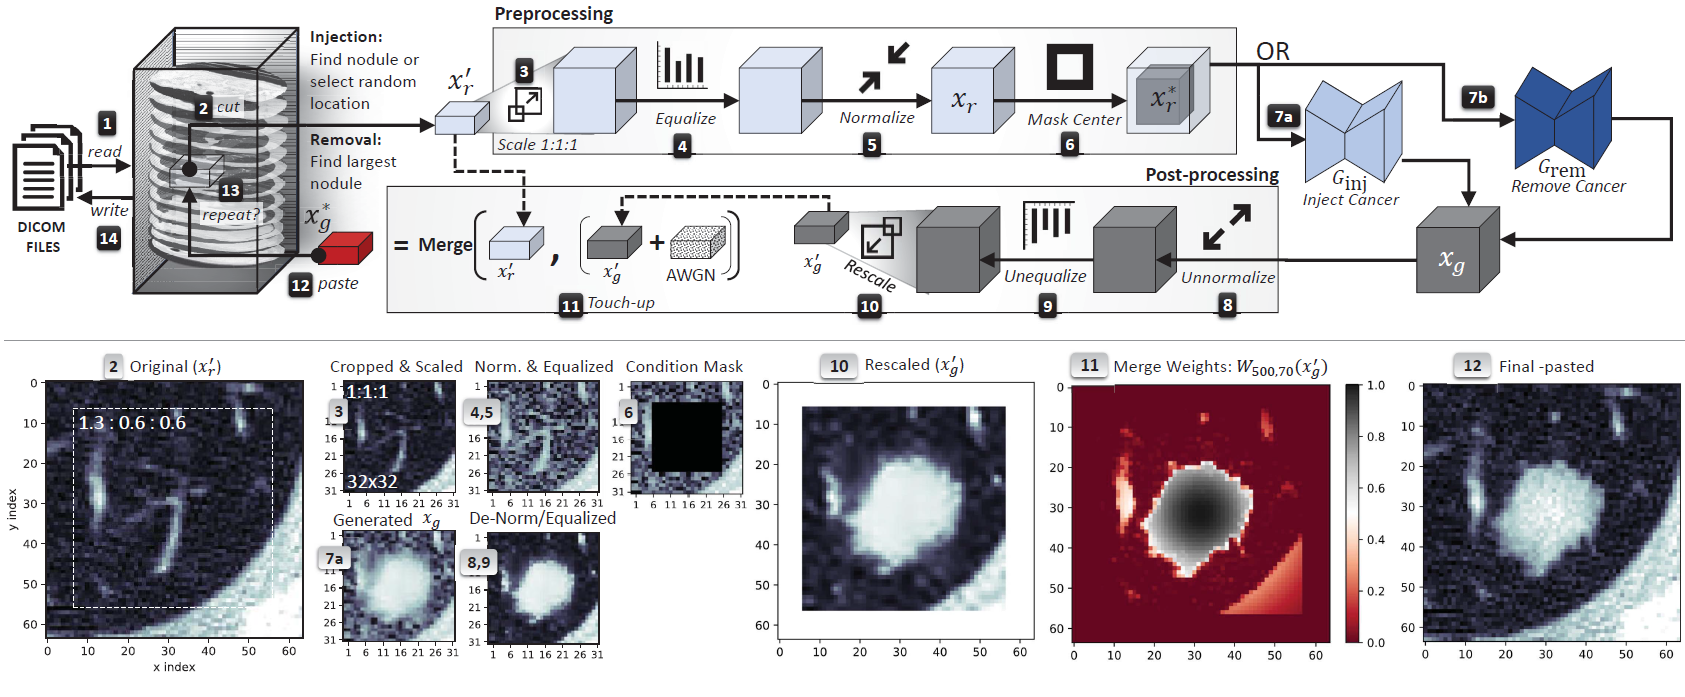
CT-GAN is a framework for automatically injecting and removing medical evidence from 3D medical scans such as those produced from CT and MRI. The framework consists of two conditional GANs |
|
|
29 |
(cGAN) which perform in-painting (image completion) on |
|
|
30 |
3D imagery. For injection, a cGAN is trained on unhealthy |
|
|
31 |
samples so that the generator will always complete the images |
|
|
32 |
accordingly. Conversely, for removal, another cGAN is trained |
|
|
33 |
on healthy samples only. |
|
|
34 |
To make the process efficient and the output anatomically |
|
|
35 |
realistic, CT-GAN perform the following steps when tampering a scan, the framework |
|
|
36 |
1. locates where the evidence should be inject/removed, |
|
|
37 |
2. cuts out a rectangular cuboid from the location, |
|
|
38 |
3. interpolates (scales) the cuboid to 1:1:1 ratio, |
|
|
39 |
4. modifies the cuboid with the respective cGAN, |
|
|
40 |
5. rescales the cuboid back to the original ratio, |
|
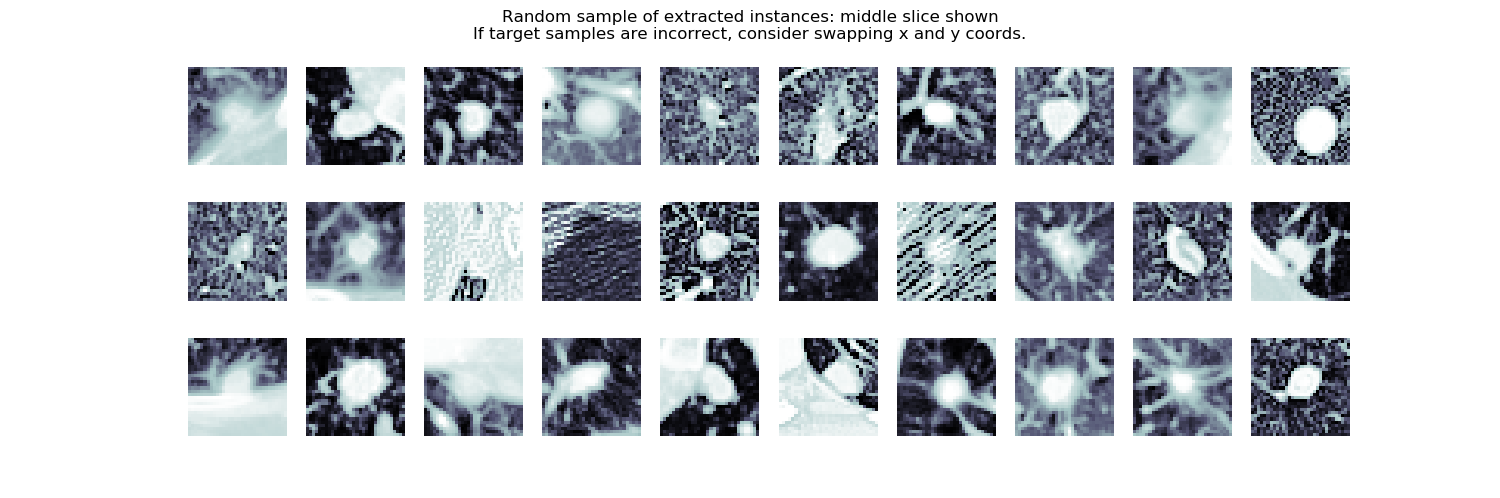
|
41 |
6. pastes the scaled and tampered cuboid back into the original scan |
|
|
42 |
|
|
|
43 |
*Top: the complete cancer injection/removal process. Bottom: sample images from the injection process. The grey numbers indicate from which step the image was taken. The sample 2D images are the middle slice of the respective 3D cuboid:* |
|
|
44 |
 |
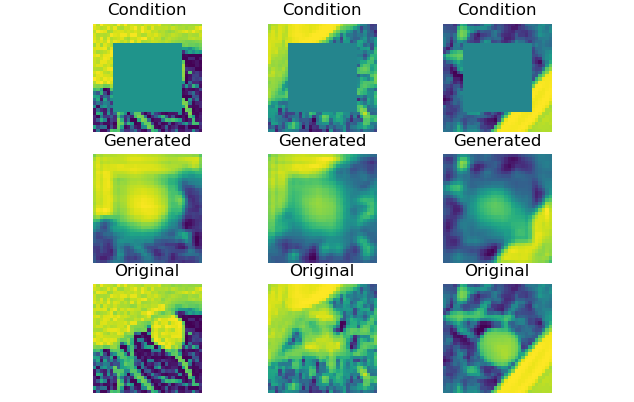
|
|
45 |
|
|
|
46 |
By dealing with a small portion of the scan, the problem complexity is reduced by focusing |
|
|
47 |
the GAN on the relevant area of the body (as opposed to the entire CT). Moreover, the algorithm complexity is reduced |
|
|
48 |
by processing fewer inputs (voxels) and concepts (anatomical features). This results in fast execution and high anatomical realism. In our paper we show how CT-GAN can trick expert radiologists 98% percent of the time and a state-of-the-art AI 100% of the time (in the case of lung cancer). |
|
|
49 |
|
|
|
50 |
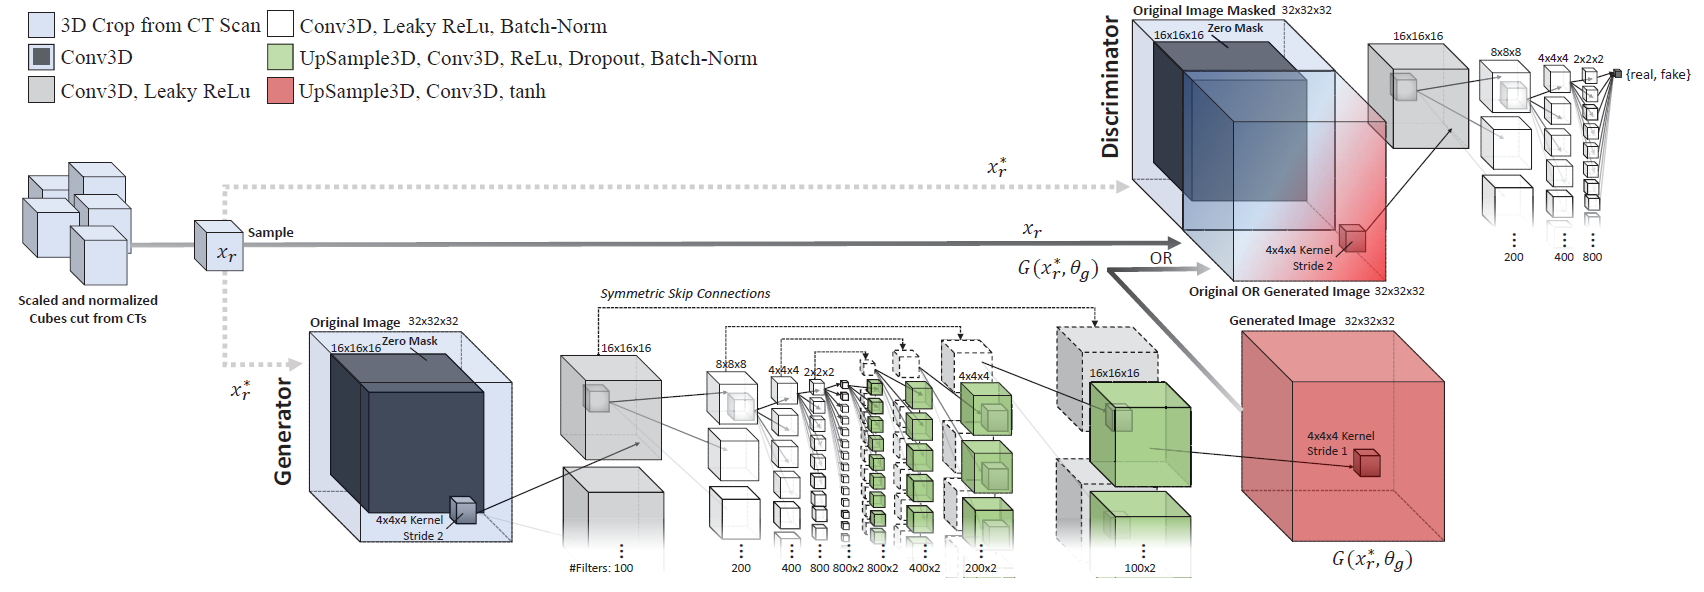
## The cGAN (pix2pix) architecture |
|
|
51 |
The cGAN architecture (layers and configurations) used for training the injector and remover generator networks is illustrated below. Overall, each cGAN has 189.5 million trainable parameters each. |
|
|
52 |
|
|
|
53 |
*The network architecture, layers, and parameters used for both the injection and removal GAN networks:* |
|
|
54 |
 |
|
|
55 |
|
|
|
56 |
|
|
|
57 |
## Sample results |
|
|
58 |
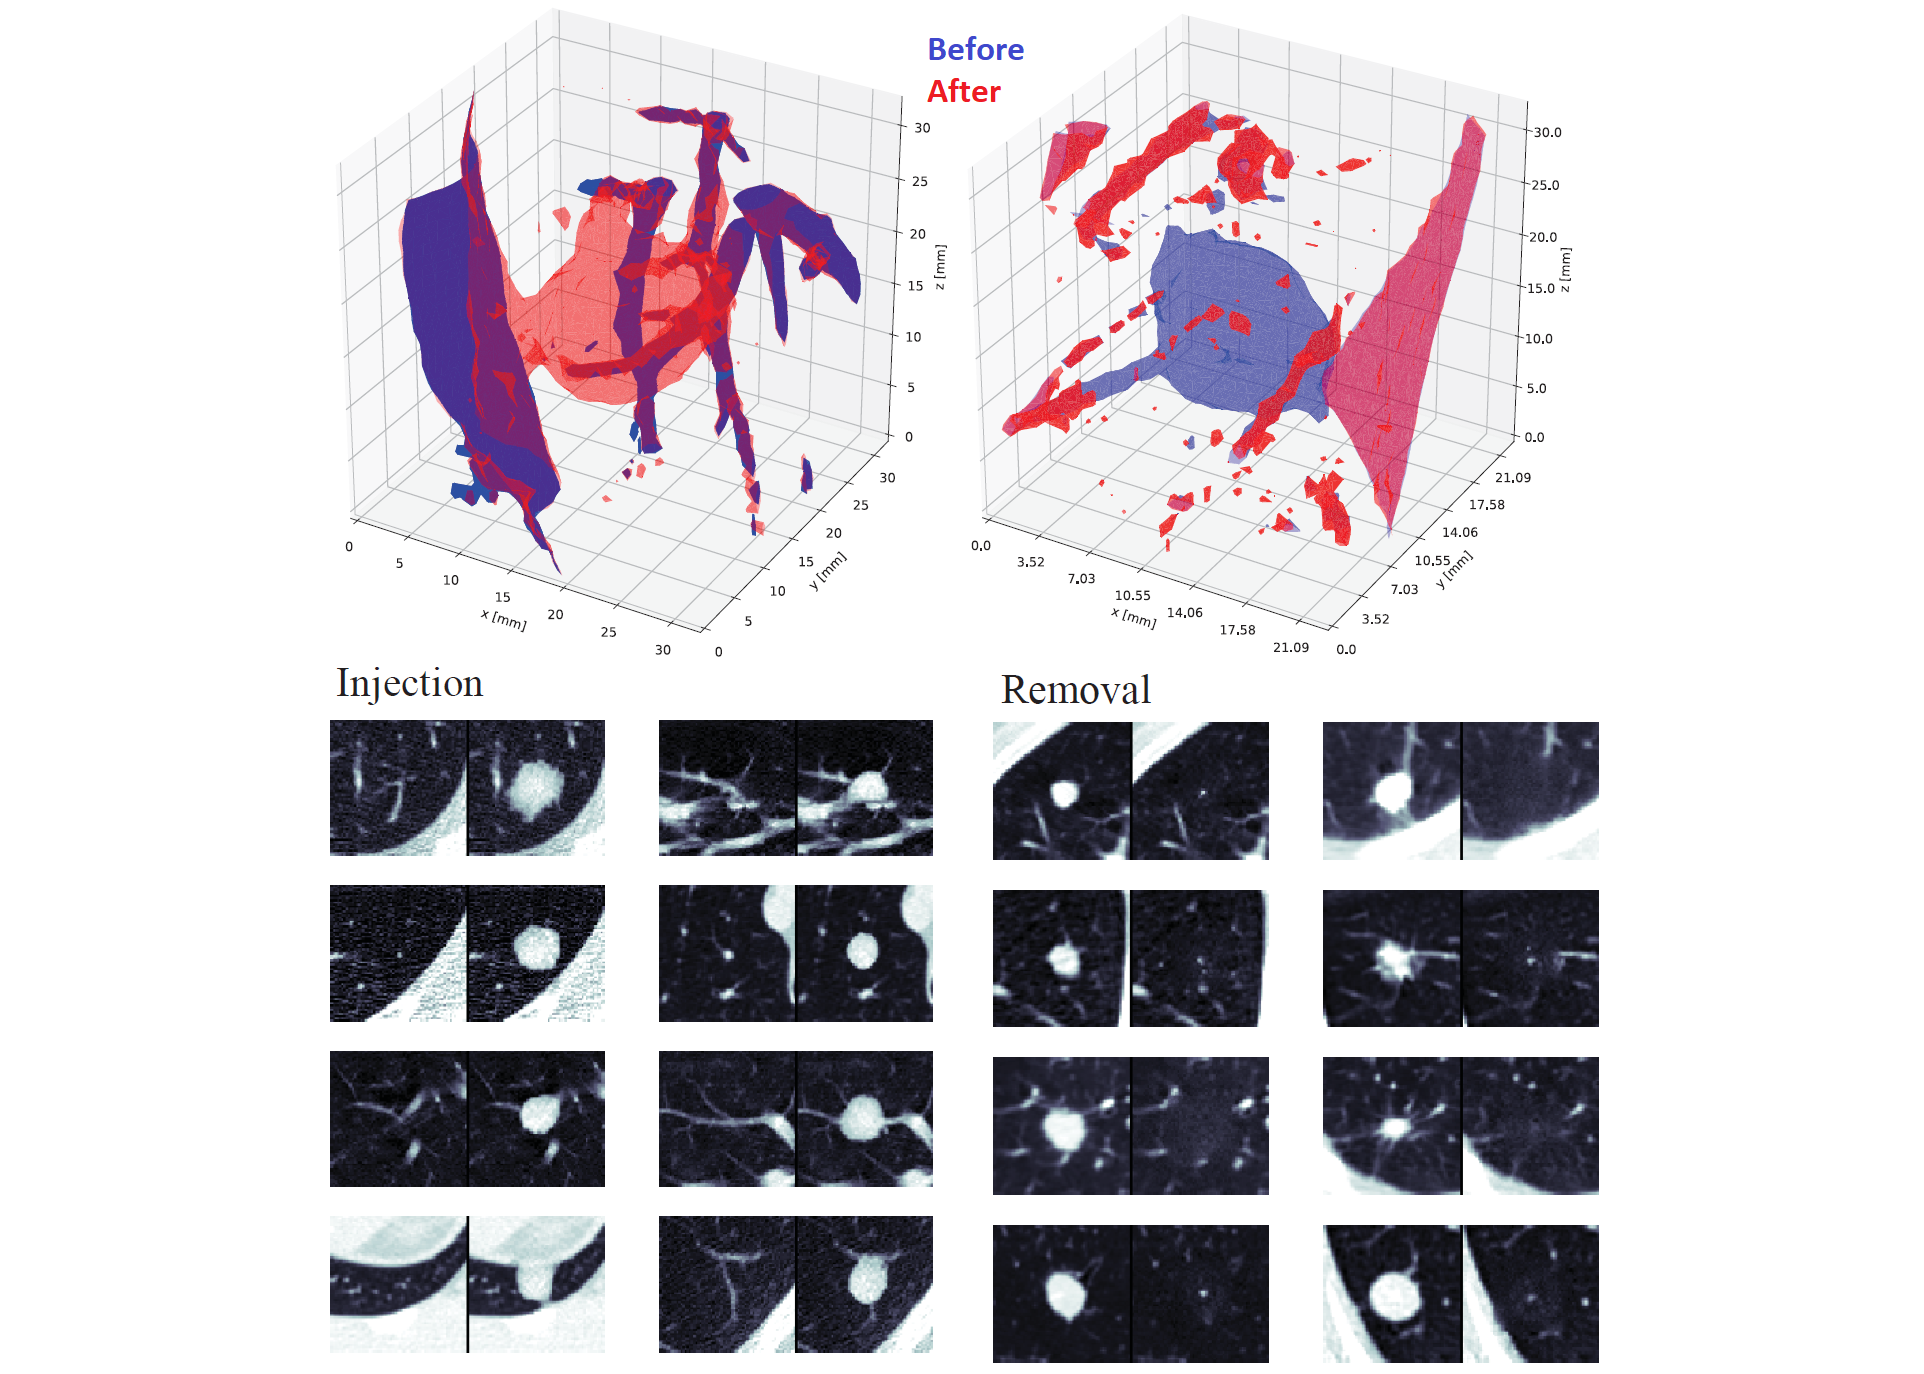
*Top: 3D models of injection (left) and removal (right) of a cancerous pulmonary lung nodule. Bottom: sample injections (left) and removals (right), where for each image, the left side is before tampering and the right side is after and only the middle 2D slice is shown:* |
|
|
59 |
 |
|
|
60 |
|
|
|
61 |
*CT-GAN used to inject brain tumors into MRIs of healthy brains. Top: context, middle: in-painted result, and bottom: ground-truth. Showing one slice |
|
|
62 |
in a 64x64x16 cuboid:* |
|
|
63 |
 |
|
|
64 |
|
|
|
65 |
*Demo video:* |
|
|
66 |
[](https://youtu.be/_mkRAArj-x0) |
|
|
67 |
|
|
|
68 |
|
|
|
69 |
## This version's features and limitations |
|
|
70 |
**Features** |
|
|
71 |
|
|
|
72 |
* build normalized/preprocessed training dataset from mhd/raw and dicom medical scans. |
|
|
73 |
* train the injection and removal networks |
|
|
74 |
* inject and remove evidence from mhd/raw and dicom scans |
|
|
75 |
|
|
|
76 |
**Limitations** |
|
|
77 |
|
|
|
78 |
* this version will not automatically locate candicate injection/removal locations within a target scan. Please see our paper for details on this algorithm. |
|
|
79 |
|
|
|
80 |
|
|
|
81 |
# The CT-GAN Code |
|
|
82 |
|
|
|
83 |
The code has been written with OOP and enables you to train CT-GAN for injection and/or removal. This repo contains example scripts for perfoming every step of CT-GAN, and the primary source code (found in the 'procedures' directory). To configure CT-GAN and its inputs, you must change the contents of [config.py](config.py) accordingly (see below for details) |
|
|
84 |
Example scripts for running CT-GAN are in the main directory: |
|
|
85 |
* **1A_build_injector_trainset.py** : Builds a preprocessed training dataset from a set of medical scans for the purpose of injecting evidence. |
|
|
86 |
* **1B_build_remover_trainset.py** : Builds a preprocessed training dataset from a set of medical scans for the purpose of removing evidence. |
|
|
87 |
* **2A_train_injector.py** : Trains the injection cGAN to perform in-painting using the extracted dataset. |
|
|
88 |
* **2B_train_remover.py** : Trains the removal cGAN to perform in-painting using the extracted dataset. |
|
|
89 |
* **3A_inject_evidence.py** : Injects evidence into a given scan at the given coordinates (you must change the hard-coded paths and values in script). |
|
|
90 |
* **3B_remove_evidence.py** : Removes evidence from a given scan at the given coordinates (you must change the hard-coded paths and values in script). |
|
|
91 |
* **tamper.py** : An all-in-one command-line tool for tampering scans given the trained model(s). |
|
|
92 |
* **GUI.py** : An interactive GUI for point and click scan tampering |
|
|
93 |
|
|
|
94 |
## Implementation Notes: |
|
|
95 |
|
|
|
96 |
* Tested on Windows Server 2012 R2 with 256GB RAM: using two Intel Xeon CPUs (E5-2660 v4 with 28 Logical Processor(s)) |
|
|
97 |
* Tested on an Ubuntu v4.4.0-142 with 128GB RAM and Xeon E7 CPUs (16 cores): using one Nvidia Titan X Pascal (Driver 418.46, CUDA 10.1) |
|
|
98 |
* Tested using Anaconda 3.7.3, Keras with the tensorflow back-end v1.13.1 |
|
|
99 |
* Python dependencies: |
|
|
100 |
* Common in most installations: multiprocessing, joblib, itertools, numpy, pickle |
|
|
101 |
* What you may need to install: keras, tensorflow, SimpleITK, pydicom, scipy, pandas, matplotlib |
|
|
102 |
|
|
|
103 |
To install the dependencies, run this in the terminal: |
|
|
104 |
``` |
|
|
105 |
pip install --upgrade scipy matplotlib pandas tensorflow keras SimpleITK pydicom |
|
|
106 |
``` |
|
|
107 |
|
|
|
108 |
## Coordinate Systems |
|
|
109 |
Coordinates in a medical scans can be denoted using world coordinates or image (voxel) coordinates. In order to use CT-GAN you need to be familiar with the difference between these systems. [[source](https://www.slicer.org/wiki/Coordinate_systems)] |
|
|
110 |
|
|
|
111 |
 |
|
|
112 |
|
|
|
113 |
### World Coordinate System |
|
|
114 |
The world coordinate system is typically a Cartesian coordinate system in which a model (e.g. a MRI scanner or a patient) is positioned. Every model has its own coordinate system but there is only one world coordinate system to define the position and orientation of each model. |
|
|
115 |
### Image (Voxel) Coordinate System |
|
|
116 |
A voxel represents a value on a regular grid in three-dimensional space (like 3D pixels). The voxel coordinate system describes how an image was acquired with respect to the anatomy. Medical scanners create regular, rectangular arrays of points and cells which start at the upper left corner. The x axis increases to the right, the y axis to the bottom and the z axis backwards. In addition to the intensity value of each voxel (x y z) the origin and spacing of the anatomical coordinates are stored too. You can also think of the system as indexes of a 3D array. |
|
|
117 |
* The origin represents the position of the first voxel (0,0,0) in the anatomical coordinate system, e.g. (100mm, 50mm, -25mm) |
|
|
118 |
* The spacing specifies the distance between voxels along each axis, e.g. (1.5mm, 0.5mm, 0.5mm) |
|
|
119 |
|
|
|
120 |
The code supports both coordinate systems, you just need to indicate which one you are using when supplying coordinates (in [config.py](config.py) and via the function call itself). |
|
|
121 |
|
|
|
122 |
|
|
|
123 |
## Using the Code |
|
|
124 |
To configure data load/save locations and other system parameters, open the [config.py](config.py) file and change the contents accordingly. The settings you can change are as follows |
|
|
125 |
``` |
|
|
126 |
## Data Location ## |
|
|
127 |
'healthy_scans_raw' #path to directory where the healthy scans are. Filename is patient ID. |
|
|
128 |
'healthy_coords' #path to csv where each row indicates where a healthy sample is (format: filename, x, y, z). |
|
|
129 |
# 'filename' is the folder containing the dcm files of that scan or the mhd file name, slice is the z axis |
|
|
130 |
'healthy_samples' #path to pickle dump of processed healthy samples for training. |
|
|
131 |
'unhealthy_scans_raw' #path to directory where the unhealthy scans are |
|
|
132 |
'unhealthy_coords' #path to csv where each row indicates where a healthy sample is (format: filename, x, y ,z) |
|
|
133 |
'unhealthy_samples' #path to pickle dump of processed healthy samples for training. |
|
|
134 |
'traindata_coordSystem' #the coord system used to note the locations of the evidence in the training data scans ('world' or 'vox'). |
|
|
135 |
|
|
|
136 |
## Model & Progress Location ## |
|
|
137 |
'modelpath_inject' #path to save/load trained models and normalization parameters for injector |
|
|
138 |
'modelpath_remove' #path to save/load trained models and normalization parameters for remover |
|
|
139 |
'progress' = "images" #path to save snapshots of training progress |
|
|
140 |
|
|
|
141 |
## tensorflow configuration ## |
|
|
142 |
'gpus' #sets which GPU to use (use_CPU:"", use_GPU0:"0", etc...) |
|
|
143 |
|
|
|
144 |
## CT-GAN Configuration ## |
|
|
145 |
'cube_shape' #dimensions (z,y,x) of the cuboid to be cut out of the scan. Default is 32x32x32. |
|
|
146 |
'mask_xlims' #length of the in-painting mask on the x-axis, centered within the cuboid. |
|
|
147 |
'mask_ylims' #... |
|
|
148 |
'mask_zlims' #... |
|
|
149 |
'copynoise' #indicates if the noise touch-up is copied onto the tampered region from a hardcoded coordinate, |
|
|
150 |
# or if Gaussain interpolated noise should be used |
|
|
151 |
``` |
|
|
152 |
We will now review how to use the example scripts provided in this repo. |
|
|
153 |
|
|
|
154 |
### Step 1: Build a Trainingset |
|
|
155 |
To build a training set for injecting evidence, you need positive examples. To extract this dataset from a set of medical scans, run |
|
|
156 |
``` |
|
|
157 |
$ python 1A_build_injector_trainset.py |
|
|
158 |
``` |
|
|
159 |
This code will load the medical scans indicated in [config.py](config.py) and create a scaled, equalized, and normalized instance from each coordinate listed in the csv 'unhealthy_coords'. Each instance is then augmented into 66 alternate versions via shifts, flips, and rotations. |
|
|
160 |
The final set of instances are then saved as a numpy serialized data file in the file 'unhealthy_samples'. |
|
|
161 |
To build a training set for removing evidence, run |
|
|
162 |
``` |
|
|
163 |
$ python 1B_build_remover_trainset.py |
|
|
164 |
``` |
|
|
165 |
Once extraction is complete you will be shown a plot containing some samples: |
|
|
166 |
|
|
|
167 |
*Example plot shown after extraction showing random instances extracted (middle slice only):* |
|
|
168 |
 |
|
|
169 |
|
|
|
170 |
### Step 2: Train the cGANs |
|
|
171 |
To train a cGAN capable of injecting/removing evidence, run |
|
|
172 |
``` |
|
|
173 |
$ python 2A_train_injector.py |
|
|
174 |
``` |
|
|
175 |
and/or |
|
|
176 |
``` |
|
|
177 |
$ python 2B_train_remover.py |
|
|
178 |
``` |
|
|
179 |
This code will use the preprocessed dataset you have created in step 1A/1B and the setting in [config.py](config.py) to train the generator models. |
|
|
180 |
Snapshots of the progress are saved to a local ‘images’ directory in png format (default is after every 50 batches). For example: |
|
|
181 |
|
|
|
182 |
*Example progress snapshot after 50 batches while training the injector:* |
|
|
183 |
 |
|
|
184 |
|
|
|
185 |
|
|
|
186 |
### Step 3: Tamper Medical Imagery |
|
|
187 |
To inject evidence into a scan using the trained models, run |
|
|
188 |
``` |
|
|
189 |
$ python 3A_inject_evidence.py |
|
|
190 |
``` |
|
|
191 |
or |
|
|
192 |
``` |
|
|
193 |
$ python 3B_remove_evidence.py |
|
|
194 |
``` |
|
|
195 |
This code will load a scan, inject/remove evidence at the provided coordinates, and then save the tampered scan. Here, the load/save locations along with the target coordinates must be changed within the example script (not via config.py). Be sure to note which coordinate system you are using. |
|
|
196 |
|
|
|
197 |
For easier use, there is an interactive GUI which can be used to scroll through scans and tamper them by clicking on the Image. The results can also be saved in dicom format. To use this tool, run |
|
|
198 |
``` |
|
|
199 |
$python GUI.py load_dir save_dir |
|
|
200 |
``` |
|
|
201 |
If the load directory is not supplied then the data/healthy_scans directory is used. The save directory is data/tampered_scans unless specified. |
|
|
202 |
|
|
|
203 |
There is also command-line tool 'tamper.py' which can be used to inject/remove evidence using your trained models. For help using this tool, run |
|
|
204 |
``` |
|
|
205 |
$python tamper.py -h |
|
|
206 |
|
|
|
207 |
usage: tamper.py [-h] -t TARGET -d DESTINATION -a {inject,remove} -c |
|
|
208 |
[COORD [COORD ...]] [-s {vox,world}] [-f {dicom,numpy}] |
|
|
209 |
|
|
|
210 |
CT-GAN medical evidence tamper pipeline. Uses a pre-trained injection/removal model to tamper evidence in a given 3D medical scan (mhd/raw or dicom series) |
|
|
211 |
|
|
|
212 |
optional arguments: |
|
|
213 |
-h, --help show this help message and exit |
|
|
214 |
-t TARGET, --target TARGET |
|
|
215 |
The path to the target scan to be tampered. The path should point to the directory containing a dicom series (*.dcm files) or a *.mhd file. |
|
|
216 |
-d DESTINATION, --destination DESTINATION |
|
|
217 |
The directory (path) to save the tampered scan. |
|
|
218 |
-a {inject,remove}, --action {inject,remove} |
|
|
219 |
The directory (path) to save the tampered scan. |
|
|
220 |
-c [COORD [COORD ...]], --coord [COORD [COORD ...]] |
|
|
221 |
The selected coordinate(s) in the target scan to inject evidence. You must provide one or more coordinates in z,y,x format with no spaces. |
|
|
222 |
Example (inject at two locations): python tamper.py -t patient.mhd -d outdir -c 123,324,401 53,201,441 |
|
|
223 |
-s {vox,world}, --system {vox,world} |
|
|
224 |
Indicate the coordinate system of the supplied target coordinates: 'vox' or 'world'. Default is 'vox'. |
|
|
225 |
-f {dicom,numpy}, --outformat {dicom,numpy} |
|
|
226 |
The output format to save the tamepred scan: 'dicom' or 'numpy'. Default is 'dicom'. |
|
|
227 |
|
|
|
228 |
To change other settings, check config.py |
|
|
229 |
For more information, please read our paper: |
|
|
230 |
CT-GAN: Malicious Tampering of 3D Medical Imagery using Deep Learning. |
|
|
231 |
Yisroel Mirsky, Tom Mahler, Ilan Shelef, and Yuval Elovici |
|
|
232 |
|
|
|
233 |
``` |
|
|
234 |
|
|
|
235 |
# Datasets |
|
|
236 |
In our research we investigated injection and removal of cancerous lung nodules in CT scans. The scans were obtained from the Cancer Imaging Archive [found here](https://wiki.cancerimagingarchive.net/display/Public/LIDC-IDRI). |
|
|
237 |
|
|
|
238 |
In [this link](https://www.kaggle.com/ymirsky/medical-deepfakes-lung-cancer) (Kaggle) you will find the *tampered* scans which we used in our blind and open experiments. These scans may be helpful if you are researching means for detecting these types of attacks. We also supply labels and our results from our radiologists and the AI. |
|
|
239 |
|
|
|
240 |
# License |
|
|
241 |
See the [LICENSE](LICENSE) file for details |
|
|
242 |
|
|
|
243 |
|
|
|
244 |
# Citations |
|
|
245 |
If you use the source code in any way, please cite: |
|
|
246 |
|
|
|
247 |
*Yisroel Mirsky, Tom Mahler, Ilan Shelef, and Yuval Elovici. 28th USENIX Security Symposium (USENIX Security 19)* |
|
|
248 |
``` |
|
|
249 |
@inproceedings {236284, |
|
|
250 |
author = {Yisroel Mirsky and Tom Mahler and Ilan Shelef and Yuval Elovici}, |
|
|
251 |
title = {CT-GAN: Malicious Tampering of 3D Medical Imagery using Deep Learning}, |
|
|
252 |
booktitle = {28th {USENIX} Security Symposium ({USENIX} Security 19)}, |
|
|
253 |
year = {2019}, |
|
|
254 |
isbn = {978-1-939133-06-9}, |
|
|
255 |
address = {Santa Clara, CA}, |
|
|
256 |
pages = {461--478}, |
|
|
257 |
url = {https://www.usenix.org/conference/usenixsecurity19/presentation/mirsky}, |
|
|
258 |
publisher = {{USENIX} Association}, |
|
|
259 |
month = aug, |
|
|
260 |
} |
|
|
261 |
``` |
|
|
262 |
|
|
|
263 |
Yisroel Mirsky |
|
|
264 |
yisroel@post.bgu.ac.il |